
A roof health assessment tells you one thing clearly: whether your roof needs monitoring, targeted repair, preservation, or full replacement. That single answer can save you anywhere from a few hundred dollars on a minor repair to $15,000–$30,000 on a premature tear-off. The goal of this guide is to walk you through every step, from a safe ground-level check you can do this weekend to what a professional inspection report should include and how to act on its findings.
Here is what to do right now:
- Walk the perimeter with binoculars and look for missing shingles, visible sagging, or granule buildup in the gutters.
- Check the attic with a flashlight for daylight, water stains, or damp insulation.
- Photograph every issue you find, label the location, and note the date.
- Schedule a professional inspection if you spot any red flags, if your roof is older than 15 years, or if a major storm just passed through.
The National Roofing Contractors Association (NRCA) recommends annual professional inspections as a baseline. InterNACHI-trained inspectors follow a structured scope that covers both the exterior system and the attic interior. And if your roof is aging but still structurally sound, Shingleroofrenewal offers a preservation-first evaluation before you ever call a roofer.
Key Takeaways
A roof health assessment is most valuable before problems become visible, not after, and most aging roofs have more options than homeowners realize.
| Point | Details |
|---|---|
| Inspect twice yearly | Spring and fall perimeter checks with binoculars catch most problems before they escalate. |
| Know the urgent red flags | Sagging, daylight through the deck, active leaks, and extensive flashing failure require professional attention within days. |
| Demand a complete report | A usable inspection report includes a condition rating, 20+ photographs, itemized findings, and estimated repair costs. |
| Preservation before replacement | If the deck is sound and shingles are intact, preservation treatment can extend roof life at a fraction of replacement cost. |
| Shingleroofrenewal offers free assessments | Homeowners in Palm Beach and Broward counties can schedule a free inspection to find out if their roof qualifies for preservation. |
Table of Contents
- What a roof health assessment actually covers
- When to schedule an inspection and what triggers one
- The full roof inspection checklist: what gets evaluated
- Inspection types: which approach fits your situation
- Safe DIY checks you can do between professional inspections
- What a professional inspection report includes and what it costs
- Common warning signs that need immediate attention
- How to prioritize repairs after an inspection
- How to choose a qualified roof inspector
- When preservation is a real alternative to replacement
- What most homeowners get wrong about roof assessments
- Your roof may qualify for preservation, not replacement
- Sources
What a roof health assessment actually covers
A roof health assessment is not just a quick look from the driveway. It is a system-level inspection of every component that keeps water out of your home: shingles or membrane, flashing and penetrations, drainage, ventilation, the structural deck, and the attic interior. Each element gets evaluated individually, then scored as part of the whole.
The outputs matter as much as the inspection itself. A solid assessment produces a condition rating (good, fair, or poor), photographic documentation with location context, an itemized list of findings, and a prioritized timeline that tells you what to fix immediately, what to schedule, and what to monitor over the next season.
Who needs what level of assessment depends on context. A routine annual check is different from a pre-purchase inspection, a post-storm damage evaluation, an insurance claim submission, or a preservation qualification review. Each scenario calls for a different depth of documentation, and knowing which one applies to you shapes how you hire and what you ask for.
When to schedule an inspection and what triggers one
Timing your inspections correctly is one of the simplest things you can do to protect your roof's lifespan. Twice-yearly checks in spring and fall are the widely recommended cadence, and a 30-minute perimeter walk with binoculars catches most problems before they escalate. For roofs older than roughly 15 years, or for homes in severe-weather regions, more frequent checks are worth the time.
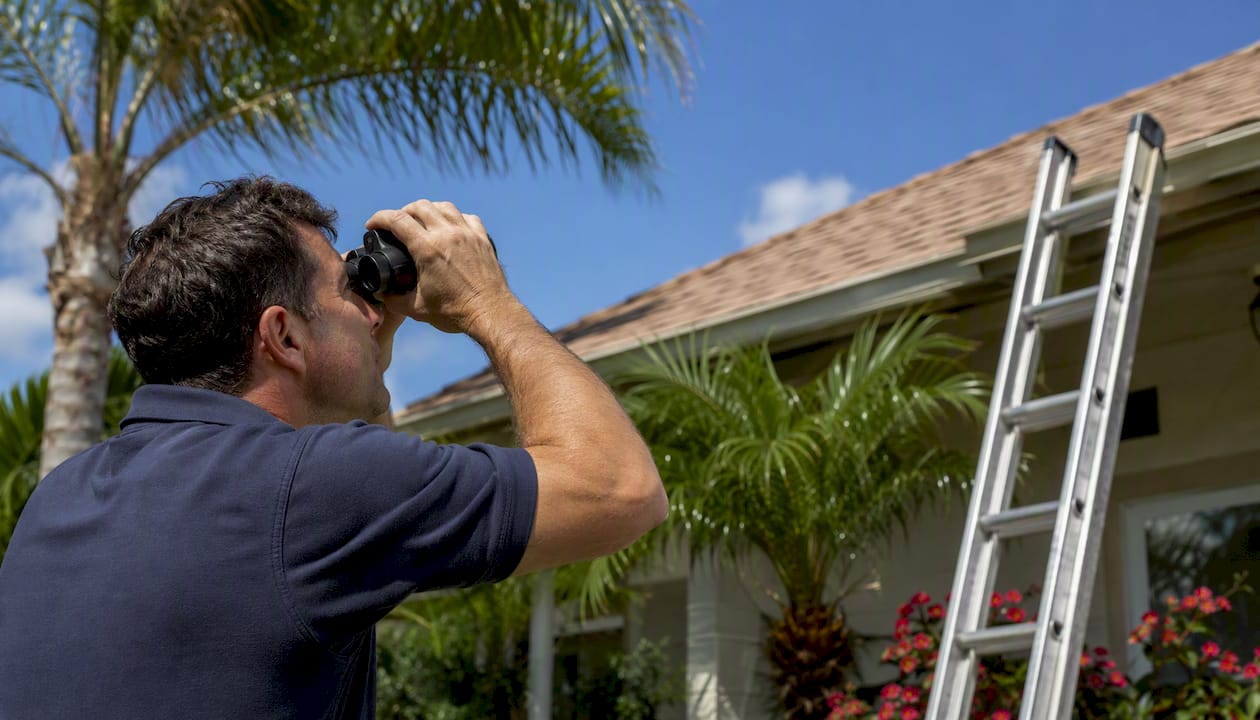
Spring inspections focus on winter damage: ice-dam evidence, lifted flashing, cracked sealant, and shingles that shifted under freeze-thaw cycles. Fall inspections shift focus to ventilation and drainage, making sure the roof is ready to handle rain, wind, and potential ice before temperatures drop.
Beyond the calendar, certain events should trigger an immediate check:
| Trigger | Recommended action |
|---|---|
| Hail storm (stones ≥1") | Professional inspection within 1–2 weeks |
| Wind event (≥50 mph) | Ground-level check same day; pro if damage visible |
| Sudden granule flush in gutters | Professional inspection; may indicate accelerated wear |
| Before listing the home for sale | Full professional inspection with written report |
| Prior to insurance renewal | Professional inspection for documentation |
| Roof age reaches 15 years | Semi-annual professional inspections from this point |
Pro Tip: After a hail storm, check your gutters and downspout splash blocks for granule accumulation before you look at the roof itself. A heavy granule flush after a single storm is one of the clearest early signals that shingles have taken impact damage.
The full roof inspection checklist: what gets evaluated
A thorough inspection covers six systems. A 30-point checklist across all six produces 20+ photographs and typically takes 75–120 minutes for a single-story home. Here is what each system includes and why it matters.
Exterior field and shingles
- Cracking and brittleness: Shingles that crack under light pressure have lost their flexibility and are near end of life.
- Curling (cupping or clawing): Cupped shingles curl upward at the edges; clawed shingles curl at the center. Both signal moisture imbalance or age-related drying.
- Granule loss: Some granule shedding is normal in a shingle's first year, but large bare patches that expose the black asphalt layer require immediate evaluation. Granules protect shingles from UV degradation; once they are gone, deterioration accelerates.
- Missing shingles: Even one missing shingle creates a water entry point. Multiple missing shingles in the same area suggest wind uplift or fastener failure.
- Algae and moss: Black streaking is usually algae (Gloeocapsa magma). Moss holds moisture against the shingle surface and accelerates granule loss underneath.
- Valleys, ridges, and edges: These high-stress zones wear faster than field shingles. Check for lifted ridge caps, exposed nails, and shingles that have slid out of alignment along the eaves.
Flashing and penetrations
- Chimney flashing: Step flashing, counter-flashing, and saddle (cricket) condition. Gaps here are among the most common sources of hidden leaks.
- Vent pipe boots: Rubber collars crack with age and UV exposure. A cracked boot around a plumbing vent is an easy fix that homeowners often overlook until water damage appears inside.
- Skylights: Check the curb flashing and sealant bead on all four sides.
- Step and counter-flashing at walls: Look for separation, rust staining, or sealant that has pulled away from the wall surface.
Drainage and gutters
- Gutter alignment and attachment: Gutters that sag or pull away from the fascia allow water to run behind them and rot the fascia board.
- Downspout discharge: Discharge should direct water at least 4–6 feet from the foundation.
- Clogged valleys: Debris-filled valleys trap water and accelerate shingle wear at the most vulnerable seam on the roof.
- Ponding: Any area where water pools for more than 48 hours after rain needs attention, particularly on low-slope sections.
Attic and interior
- Daylight through the sheathing: Any visible light means there is a gap in the deck. That gap is also a water entry point.
- Water stains on rafters or sheathing: Old stains indicate past leaks; fresh stains mean an active one.
- Damp or compressed insulation: Wet insulation loses its R-value and can harbor mold. Compressed insulation near the eaves often signals blocked soffit vents.
- Mold or mildew: A musty smell or visible mold growth in the attic can indicate either a roof leak or a ventilation problem. Attic condensation from poor airflow can create stains that mimic active leaks, so always check ventilation before assuming the roof is the source.
- Soffit and ridge vent functionality: Blocked soffit vents are a leading cause of premature shingle failure in hot climates. Ridge vents should be clear of debris and insulation.
- Deck softness: Walk the attic carefully and press on the sheathing. Soft or spongy spots indicate rot or delamination.
Documenting your findings
Photograph every issue with a close-up shot and a wider context shot showing its location on the roof. Label each photo with the location (e.g., "north valley, 6 feet from ridge") and timestamp it. This documentation supports insurance claims, contractor quotes, and year-over-year condition comparisons. You can use the roof evaluation checklist for homeowners as a one-page reference while you work through each system.
Inspection types: which approach fits your situation
Not every inspection is the same. The right method depends on your roof's age, pitch, complexity, and what you need the report to accomplish.
| Inspection type | What it finds | What it misses | Best for |
|---|---|---|---|
| Ground-level visual | Missing shingles, obvious sagging, visible granule loss | Flashing gaps, underlayment condition, attic issues | Quick homeowner spot-check |
| Walk-on visual | Nail counts, soft spots, sealant condition, underlayment clues | Attic interior, moisture below surface | Standard professional inspection |
| Drone-only | Full field coverage on steep or high roofs; safe for inspector | Attic/underlayment; cannot feel soft spots | Steep roofs, safety-restricted access |
| Infrared/thermal | Trapped moisture beneath surface | Exact leak source; cause of moisture | Post-storm, pre-purchase, insurance claims |
| Engineer-level structural | Deck integrity, load capacity, structural movement | Not a roofing-specific inspection | Major damage, sagging, permit requirements |
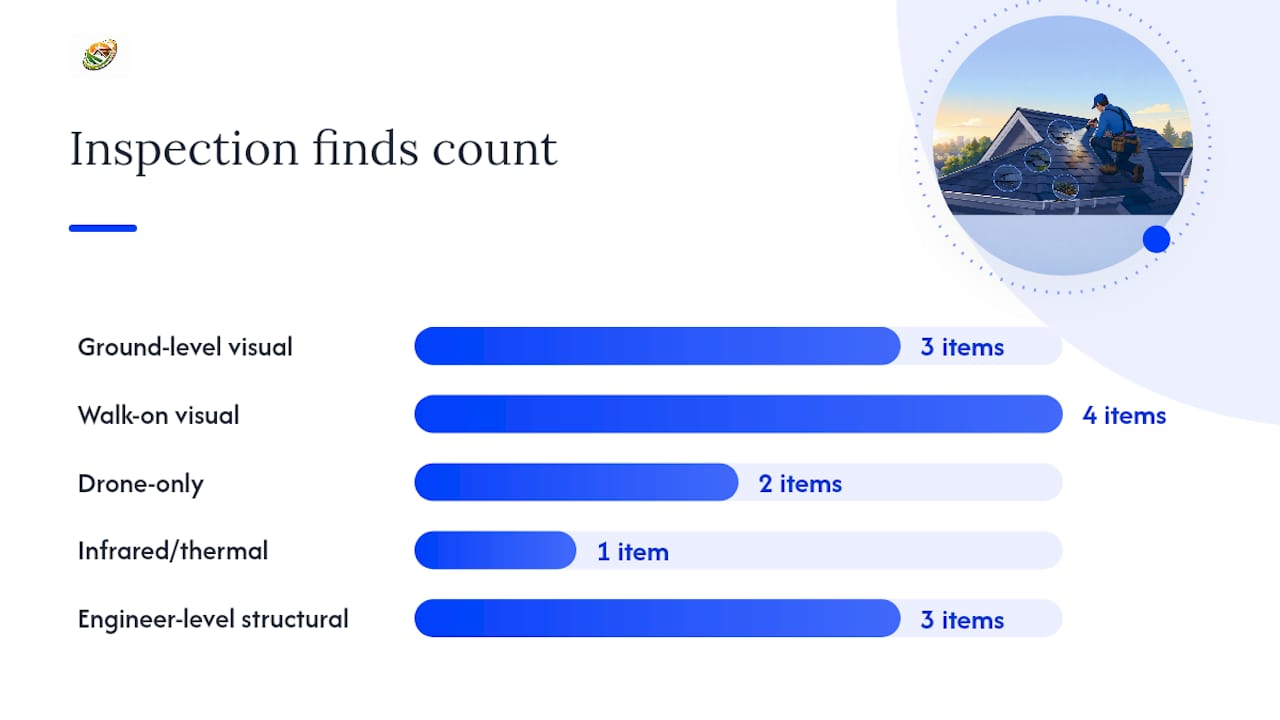
Drone imaging is safe for steep roofs but misses attic and underlayment conditions without a follow-up interior check. Infrared detects trapped moisture but does not pinpoint the exact leak source. The gold-standard approach pairs drone imaging for high-risk surfaces with a walk-on at critical features and a full attic walkthrough.
Common tools professionals bring: binoculars, flashlight, moisture meter, infrared camera, drone, measuring tape, chalk line, and roof anchors with a harness for steep pitches. For a complete list of what to have on hand for homeowner spot-checks, the must-have roof inspection tools guide covers both equipment and safety gear.
Safe DIY checks you can do between professional inspections
You do not need to climb on your roof to catch most problems early. A structured ground-level and attic check, done twice a year, gives you a reliable picture of your roof's condition between professional visits.
Ground-level walkthrough
- Stand at each corner of the house and scan the full roof plane with binoculars.
- Look for missing or displaced shingles, visible sagging along the ridgeline or in the field, dark staining patterns, and any areas where shingles appear lifted or buckled.
- Check the fascia and soffit from the ground for peeling paint, rot staining, or gaps where animals could enter.
Attic inspection steps
- Go into the attic on a bright day and turn off your flashlight for 30 seconds. Any pinpoints of light mean gaps in the deck.
- Turn the flashlight back on and scan the underside of the sheathing and rafters for water stains, dark discoloration, or mold.
- Press gently on the sheathing in several spots. Solid is good; any give or sponginess needs a professional follow-up.
- Check that insulation near the eaves is not blocking the soffit vents. Blocked vents are a common cause of premature shingle aging.
Gutter check
- After a rain, walk the perimeter and look for granules in the gutters and downspout splash blocks. A small amount is normal; a heavy deposit after one storm is not.
- Clear any debris from the gutters and confirm downspouts discharge water at least 4–6 feet from the foundation.
- Look for rust staining or standing water inside the gutter trough, which can indicate drainage problems upstream.
A 30-minute perimeter walk with binoculars twice a year catches most problems before they escalate and takes less time than most homeowners expect. Pair it with the roof care maintenance priorities checklist to stay organized across seasons.
Safety rules — non-negotiable:
- Never climb on a steep-pitch or wet roof without fall protection.
- Always use a partner when working on a ladder.
- Avoid ladder work in high heat, wind, or after rain.
- Wear rubber-soled shoes and use a stabilizer bar to keep the ladder off the gutters.
- If you cannot safely reach a section, stop and call a professional.
Pro Tip: Take your ground-level photos from the same positions each year. Side-by-side comparisons from the same angle make gradual changes, like slow granule loss or a ridge that is beginning to sag, much easier to spot than a single inspection ever would.
What a professional inspection report includes and what it costs
A professional inspection report is not just a summary. It covers exterior roofing components and the attic interior, and standard deliverables include a condition rating, photographs, priority recommendations, and estimated repair costs. Here is what a complete report looks like and what you should expect to pay.
Standard report deliverables
- Condition rating: Good, fair, or poor, with an estimated remaining service life in years.
- Photographic documentation: A full report commonly includes 20–60 photographs with location labels and timestamps. Close-up shots of defects plus wider context shots showing their position on the roof.
- Itemized findings: Each defect listed with a pass, monitor, or repair status.
- Priority recommendations: Immediate (repair within days), scheduled (repair within weeks), and monitor (check next season).
- Estimated repair costs: Line-item estimates for each finding so you can budget and compare contractor quotes.
Timing
A thorough inspection on a typical single-family home takes 45–120 minutes depending on roof complexity, pitch, and whether attic access is included. Report delivery within 48–72 hours is standard for full documentation packages.
Typical cost ranges
Basic visual inspections for single-story homes typically cost under a few hundred dollars. Comprehensive packages that include infrared thermal imaging and drone photography cost more, depending on roof complexity and documentation requirements.
The higher cost of a comprehensive inspection is often justified when you need insurance-grade documentation, are preparing for a real estate transaction, or want to establish a baseline before committing to preservation or repair work. Professional inspections provide insurance-grade documentation and use trained observers and diagnostic tools to identify issues like failing underlayment or flashing gaps that DIY checks often miss. Understanding the roof insurance claim process before you schedule an inspection helps you know exactly what documentation your insurer will require.
Common warning signs that need immediate attention
Some findings can wait for a scheduled repair. Others cannot. Knowing the difference keeps a manageable problem from becoming a structural one.
Urgent red flags
These require a professional assessment within days, not weeks:
- Sagging roofline or deck: Sagging signals structural compromise, whether from rot, overloading, or failed framing. This is not a shingle problem.
- Daylight visible through the deck: Any gap in the sheathing is an active water entry point and a structural vulnerability.
- Active attic leaks or fresh staining: Water currently moving through the system needs to be stopped before any other repair is meaningful.
- Exposed deck rot: Soft, dark, or crumbling sheathing means the structural layer is compromised and needs replacement before new shingles go on.
- Extensive flashing failure: Multiple flashing sections that have pulled away or corroded through create hidden moisture pathways that cause far more damage than the flashing itself costs to fix.
High-priority signs
These need attention within weeks:
- Widespread granule loss with large bald patches exposing the black asphalt layer. Granules protect shingles from UV damage; once they are gone in large areas, the shingle's remaining life shortens quickly.
- Multiple missing shingles across more than one section of the roof.
- Buckling or curling affecting a large percentage of the field shingles.
- A sudden, heavy granule flush in the gutters after a single storm, which often indicates impact damage from hail.
Why small problems grow fast
A flashing gap the width of a pencil can direct water behind a wall for months before the interior staining appears. Poor attic ventilation does not just shorten shingle life; it creates heat and moisture conditions that accelerate every other failure mode simultaneously. Ice-dam evidence in cold climates, or moisture staining near the eaves in warm climates, often points to an insulation and ventilation problem that is driving shingle deterioration from the inside out.
How to prioritize repairs after an inspection
An inspection report gives you findings. What you do with them is the decision that actually protects your investment. Use this framework to convert findings into a clear action plan.
Monitor: No active damage, condition rated good. Schedule your next check in six months and document the baseline.
Preventive maintenance: Minor granule loss, small sealant cracks, or isolated moss growth. Address these with targeted maintenance before they progress. A $50–$300 repair at this stage routinely prevents a $1,000–$5,000 deck or flashing failure later.
Targeted repair: Specific defects with clear scope: a missing shingle section, a failed vent boot, a single flashing gap. Get two or three contractor quotes using the inspector's itemized findings as the scope of work.
Preservation (renewal): Shingles show brittleness, granule loss, or early curling, but the deck is sound, flashing is repairable, and the majority of shingles are intact. This is the stage where preservation treatment can extend roof life significantly and delay or avoid full replacement.
Full replacement: Structural deck failure, widespread rot, multiple failed systems, or a roof that has exceeded its service life with no remaining viable substrate. At this point, replacement is the only responsible path.
- Use the inspector's priority ranking directly: immediate means days, scheduled means weeks, monitor means next seasonal check.
- Never skip from "monitor" to "replacement" without first evaluating whether targeted repair or preservation can address the underlying issues.
- The roof assessment process guide walks through how a proper evaluation leads to the right repair or preservation choice, with cost comparisons at each stage.
How to choose a qualified roof inspector
The inspector you hire determines the quality of the report you get. A weak report is worse than no report, because it gives you false confidence. Here is what to look for and what to avoid.
Credentials and deliverables to demand
- Alignment with InterNACHI or NRCA inspection standards, which define scope, documentation requirements, and professional conduct.
- A written report with photographs, a condition rating, itemized findings, and priority recommendations.
- Estimated repair costs per finding, not just a single total.
- If needed for insurance or structural concerns, the ability to provide a PE-stamped engineer letter.
Questions to ask before you book
- Do you include infrared or drone imaging if the situation calls for it?
- How many photographs does your standard report include?
- How do you estimate remaining service life?
- Are you licensed and insured in this state?
- What is your turnaround time for the full written report?
Red flags that should make you walk away
- A one-page "OK" report with no photographs and no itemized findings.
- No written documentation at all, just a verbal summary.
- Pressure to commit to immediate full replacement without documented cause in the report.
- An inspector who will not access the attic as part of the inspection.
- No mention of condition rating or remaining service life estimate.
A report that includes priority recommendations (immediate, schedule, monitor) and estimated repair costs is the most useful tool you have for budgeting next steps. If the inspector cannot deliver that, find one who can.
When preservation is a real alternative to replacement
Full replacement is not always the next step after a concerning inspection. For many aging asphalt shingle roofs, preservation is a legitimate, cost-effective option, provided the roof meets specific criteria.
Preservation eligibility criteria
A roof qualifies for preservation treatment when:
- The majority of shingles are intact with no widespread decking exposure.
- Flashing is repairable rather than failed across multiple sections.
- The structural deck is sound: no sagging, no widespread rot, no soft spots across large areas.
- Shingles show granule loss, brittleness, or early curling but have not reached catastrophic substrate failure.
If those conditions are met, the roof is a candidate for treatment rather than tear-off.
The three-step preservation workflow
- Inspect: A thorough assessment of all six systems, documented with photographs and a condition rating.
- Qualify: Condition scoring against preservation criteria to determine whether the roof is a viable candidate.
- Treat: Application of a preservation treatment (such as Green Soy Technology) that restores shingle flexibility, locks in granules, and extends roof life, backed by a transferable warranty when offered by a qualified provider.
What preservation saves
Preservation can cost significantly less than full replacement, which typically runs $15,000–$30,000 for a residential roof. When a roof qualifies, the savings are substantial and the environmental benefit is real: no unnecessary tear-off, no shingle waste going to a landfill. A transferable warranty adds value at resale. The roof assessment guide on unlocking value through preservation explains how a detailed assessment uncovers these opportunities before homeowners commit to replacement.
What most homeowners get wrong about roof assessments
Most people treat a roof inspection as something you do after a problem appears. That is the wrong sequence. By the time water stains show up on your ceiling, the damage has usually been building for months, sometimes years. The inspection is most valuable when it happens before the symptoms are obvious.
There is also a tendency to treat every inspection finding as a binary: either the roof is fine or it needs to be replaced. That framing skips the middle ground entirely, and the middle ground is where most roofs actually live. Brittleness, granule loss, and early curling are not replacement triggers. They are preservation triggers. The difference between catching a roof at that stage versus waiting until structural failure sets in can be $10,000 or more.
One more thing worth saying plainly: not every inspector delivers a report worth acting on. A report with no photographs, no itemized findings, and no condition rating is not a professional assessment. It is a liability shield for the inspector. Demand the documentation you need, or find someone who will provide it.
Your roof may qualify for preservation, not replacement
Most homeowners in South Florida spend $15,000–$30,000 on a roof replacement they did not need yet. Shingleroofrenewal exists to change that.

We are not roofers. We are the company you call before the roofer. Our process is straightforward: we inspect your roof, assess its condition, and tell you honestly whether it qualifies for preservation using certified Green Soy Technology. If it does, you could save significantly compared to full replacement, backed by a 6-year transferable warranty. We serve homeowners across Palm Beach and Broward counties, where Florida sun, heat, and storms dry out shingles faster than almost anywhere else in the country.
If your roof is showing signs of aging but the deck is still sound, do not replace it until you know whether preservation is an option. Schedule your free roof assessment in Delray Beach or book your free inspection in Plantation and find out if your roof qualifies before you spend a dollar on replacement.
Sources
The following sources were used in preparing this guide. Each one offers additional depth on specific aspects of roof inspection and condition evaluation.
- 30-Point Roof Inspection Checklist (Free PDF) | TRB
- How to know if you need a new roof | IKO
- Roof Inspection Guide (2026) | American Roofing Guide
- Spring & Fall Roof Inspection Checklist for Homeowners — Roof Quotes Near Me