TL;DR:
- Roof restoration can extend shingle life if structural integrity remains sound.
- Proper assessment, preparation, and application are crucial for successful asphalt shingle rejuvenation.
- Replacement is necessary for roofs with significant damage or structural issues beyond restoration's scope.
Your roofing contractor just handed you a quote for $22,000 to replace your aging asphalt shingle roof. Your stomach drops. But here's the question most homeowners in Broward and Palm Beach County never think to ask: does your roof actually need to be replaced, or has years of South Florida sun, heat, and storm season simply dried out your shingles? If your shingles have lost flexibility but the underlying structure is still sound, restoration could save you thousands of dollars and add real years to your current roof. This guide walks you through exactly how that process works, from assessment to application to long-term results.
Table of Contents
- Assessing your roof: Is restoration right for you?
- What you'll need: Tools, materials, and prep work
- Step-by-step: Restoring flexibility to aging shingles
- How to check results and avoid common mistakes
- Our take: Restoration works, but replacement still has its place
- Ready to renew your shingle roof? See our certified restoration services
- Frequently asked questions
Key Takeaways
| Point | Details |
|---|---|
| Check eligibility first | Not all roofs qualify; severe granule loss or major damage requires full replacement. |
| Prep is critical | Thorough cleaning and correct materials ensure the best results from a rejuvenator. |
| Follow each step | Careful application maximizes performance and prolongs your roof's life. |
| Monitor after treatment | Inspect the roof periodically to verify flexibility and spot issues early. |
Assessing your roof: Is restoration right for you?
Before committing to restoring your roof, make sure it's a viable option under local regulations and based on your roof's actual condition. Not every aging roof is a candidate, and jumping in without checking can waste money or even create code violations.
The most important first step is an honest visual assessment. Walk around your home and look up. Then, if it's safe to do so, get a closer look from your ladder. Here's what you're looking for:
Signs that restoration may work for your roof:
- Shingles are dry, brittle, or curling slightly at the edges
- Minor granule loss in a few localized spots
- Surface cracking or small splits in shingles
- Shingles that look faded or weathered but are otherwise intact
- No visible sagging or soft spots on the roof deck below
Red flags that signal replacement instead:
- Heavy granule loss across most of the roof surface
- Visible rot or dark staining on the decking beneath
- Large areas of missing shingles
- Interior leaks that have caused water damage inside your home
- Shingles that crumble or break when touched
Florida climate impacts on asphalt shingles are particularly severe. The intense UV exposure, heat cycling, and tropical storm season accelerate the natural drying process that causes shingles to lose their asphalt oils and become rigid. That rigidity leads to cracking and curling long before the underlying structure is compromised.
There's also a legal dimension here. Per the National Roof Repair Authority, you should not apply rejuvenating products to roofs with more than 30% granule loss, structural damage, rot, or where more than 25% of the total roof area is affected, since Florida code requires full replacement in those cases.
Important: If your roof has already crossed the threshold where Florida building code requires replacement, restoration is not a legal or safe alternative. A professional assessment protects you from costly code violations down the road.
Understanding the roof assessment process in detail before you start will help you avoid this mistake. When in doubt, schedule a professional inspection. A trained eye catches things a casual look won't, and it's the only way to know for certain whether restoration is a realistic option for your home.
There are also strong financial and practical reasons to restore instead of replace when your roof qualifies. Cost savings alone can reach up to 80% compared to a full tear-off and replacement.
What you'll need: Tools, materials, and prep work
If your roof is a good candidate, gathering the right materials and preparing properly will set you up for a smooth restoration process. Skipping prep work is one of the most common mistakes homeowners make, and it directly affects how well the rejuvenator absorbs and performs.
Basic tools and materials checklist:
- Extension ladder with stabilizer feet
- Pump sprayer (garden-style with adjustable nozzle)
- Soft-bristle brush or push broom
- Safety harness and non-slip roof shoes
- Nitrile gloves and safety glasses
- Garden hose with spray attachment
- Certified soy-based shingle rejuvenator
- Plastic sheeting or drop cloths for landscaping protection
- Low-tack tape for protecting siding edges
The main product in this process is the rejuvenator itself. Soy-based rejuvenators are the gold standard for asphalt shingle restoration. They work by replenishing the maltene oils that dry out of shingles over time, restoring their molecular structure from the inside out. Lab tests show soy-based rejuvenators restore flexibility, tensile strength, UV resistance, and ductility to near-new levels in aged shingles, which is a meaningful improvement for a roof that still has structural integrity.
| Material | Purpose | Notes |
|---|---|---|
| Soy-based rejuvenator | Restores shingle flexibility and UV resistance | Choose a certified product from a reputable applicator |
| Pump sprayer | Even product distribution | Use 1-2 gallon capacity for residential roofs |
| Soft brush | Clearing debris before application | Avoid wire bristles that can damage granules |
| Safety harness | Fall protection | Non-negotiable on pitched roofs |
| Plastic sheeting | Protects plants and hardscaping | Cover fully before application begins |
Prep work steps before you apply anything:
- Clear all loose debris: leaves, twigs, and dirt from the entire roof surface
- Rinse the roof with a garden hose (no pressure washer, which can blast off granules)
- Allow the roof to dry completely, typically 24 to 48 hours
- Cover all landscaping, gutters, and surfaces below the roofline
- Check the weather forecast and confirm no rain for at least 24 hours post-application
Pro Tip: Never apply a rejuvenator to a wet or damp shingle surface. Moisture blocks absorption and reduces the product's effectiveness significantly. Early morning applications on clear days work best in South Florida's humid climate.
For more context on the product side of this process, the soy-based rejuvenator benefits are well documented, and it's worth understanding what separates a certified applicator from a generic spray-on coating service. The difference in penetration depth and long-term results is substantial.
Step-by-step: Restoring flexibility to aging shingles
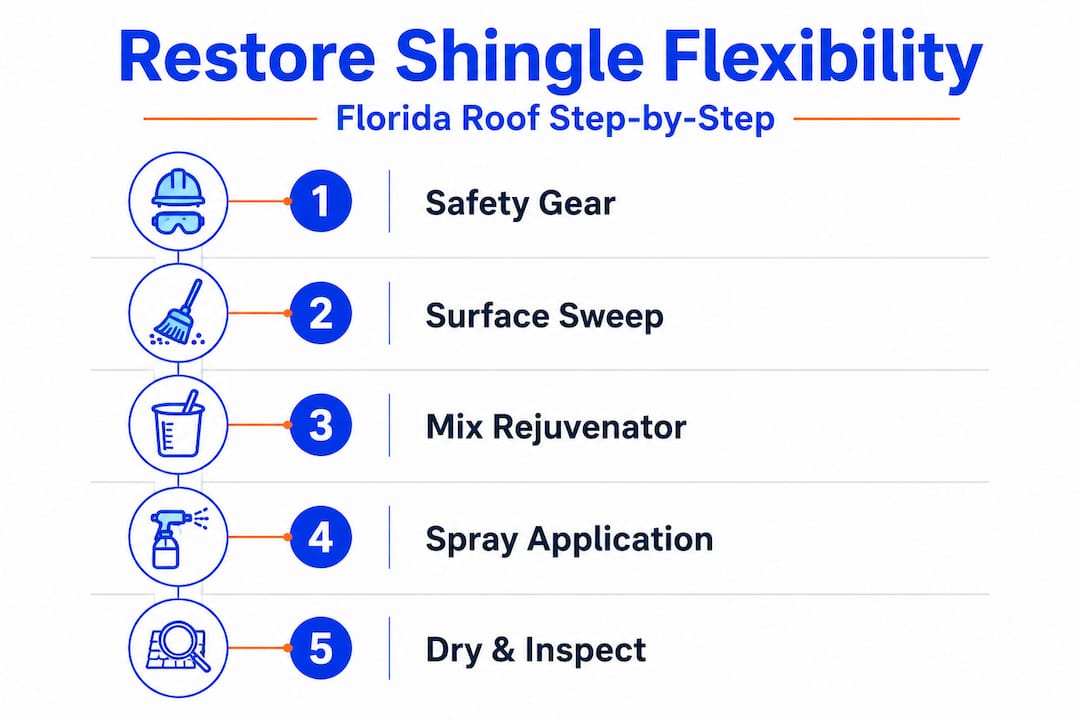
With your preparation done, follow these key steps to bring flexibility and life back to your aged shingles. This is where the process comes together, and doing each step in the right order matters.
Step 1: Safety setup
Put on your harness, gloves, and non-slip footwear before you get on the roof. If your roof pitch is steep or you have any physical limitations, this is the point where hiring a professional makes the most sense. Falls from residential roofs cause serious injuries every year. No amount of savings is worth that risk.
Step 2: Final debris check
Even after prep day, leaves and debris blow back overnight. Do a quick sweep of the surface before you start applying the product. Pay attention to valleys and low points where debris collects.
Step 3: Load and test your sprayer
Fill your pump sprayer with the rejuvenator product according to the manufacturer's dilution instructions. Test the spray pattern on a piece of cardboard first. You want a wide, even fan pattern, not a concentrated stream that could pool on the shingle surface.
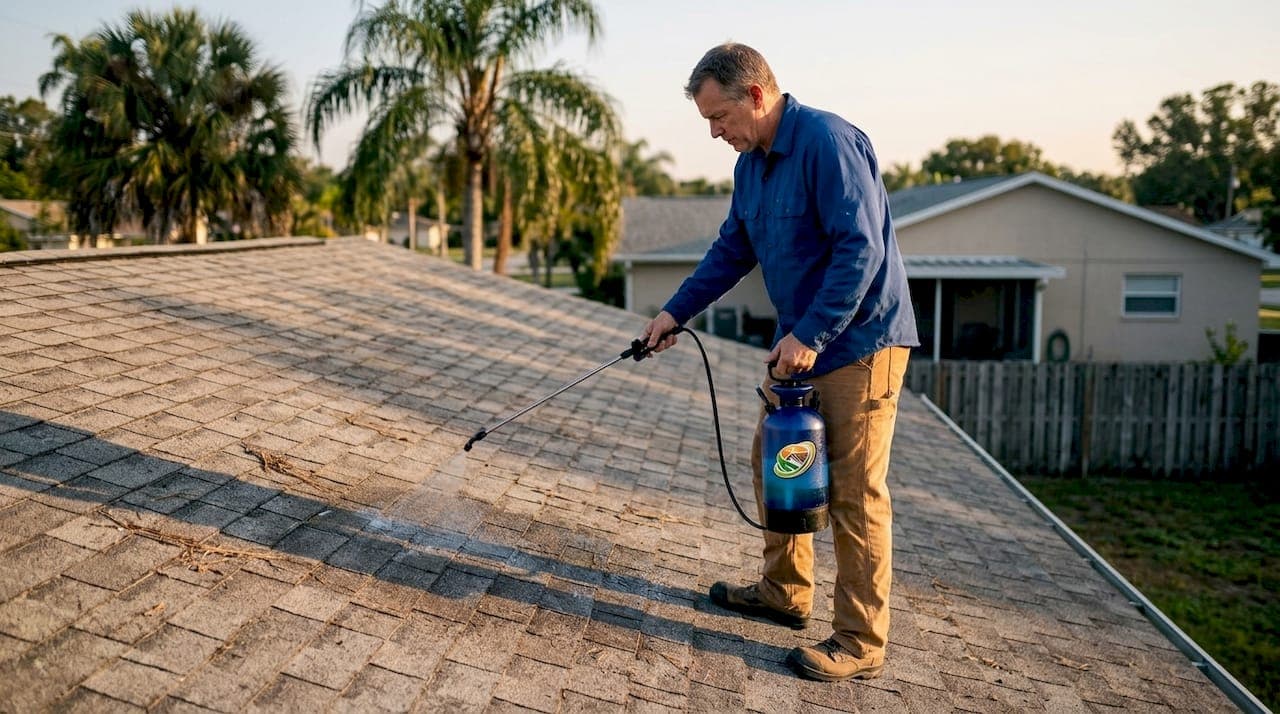
Step 4: Apply from the top down
Start at the ridge line and work your way down toward the eaves. This is the most efficient path and prevents you from walking over treated areas. Overlap each pass by about 6 inches to avoid missed strips. Apply at a consistent, moderate pace so the product goes on evenly.
Step 5: Avoid over-saturation
One of the most common application errors is applying too much product in one area. The shingles should look darkened and damp, not pooling or dripping. Over-saturation can cause product runoff into your gutters and landscaping, and it doesn't improve results. Less is more here.
The Springer research on soy-based rejuvenators confirms that the product works by penetrating the asphalt at the molecular level, restoring maltene content and structural flexibility, not by coating the surface. So even coverage is more valuable than heavy application.
Step 6: Allow full drying time
Most certified products require 24 to 48 hours to cure before rain exposure. Check your specific product's label. In South Florida, keep a close eye on afternoon storm activity during summer months, since pop-up thunderstorms can arrive with little warning.
Step 7: Document and inspect
Take photos of the finished roof from multiple angles. Note any areas that look lighter or show uneven coverage. These spots may need a second light pass after the first application fully cures.
If you want to see what this process looks like in a real South Florida neighborhood, check out the Plantation restoration example for a before-and-after look at how the process transforms aging shingles. Also, the shingle smart renewal tips article covers additional nuances for Florida-specific conditions.
How to check results and avoid common mistakes
After restoration, it's important to monitor your roof and recognize whether the process was successful, or if issues need correcting before they become bigger problems.
What successful restoration looks like:
- Shingle edges that were curling begin to lie flatter within a few weeks
- The surface feels more pliable and less brittle when gently pressed
- Color looks more uniform and refreshed across the entire roof
- No new granule loss occurs in the months following treatment
Warning signs of a problem application:
- Streaky or uneven color patterns indicating missed spots or inconsistent spray
- Runoff marks on siding or gutters from product dripping during application
- Areas that still feel rigid and crack-prone after the full cure period
- A strong chemical odor persisting more than 72 hours after application
| Issue | What it means | What to do |
|---|---|---|
| Missed spots | Uneven coverage during spray | Apply a second light pass over affected areas |
| Runoff marks | Over-saturation during application | Clean with mild soap and water; adjust technique next time |
| No flexibility improvement | Product may not have absorbed properly | Re-inspect; consider professional re-application |
| Persistent cracking | Shingles may have been too far gone | Consult a professional about replacement eligibility |
Pro Tip: Gently lift one or two shingle edges at different points on the roof about 30 days after application. If the shingle flexes without cracking or snapping, the restoration is working. If it still breaks cleanly, the shingles may have been past the point of effective treatment.
One critical mistake to avoid: applying a rejuvenator to a roof that doesn't qualify. Per code requirements for Florida roofs, roofs with more than 25% surface damage or significant structural issues must be replaced, not treated. Applying product to a disqualified roof doesn't fix the underlying problem and can create complications during future insurance claims or home sales.
Schedule a roof check every six months after restoration, especially before and after hurricane season. Catching small issues early is what keeps a restored roof performing well for the full 10 to 15 year extended lifespan. The risks and rewards of renewal are both real, and ongoing maintenance is what tips the balance toward long-term success.
If you're still weighing your options, reviewing the restore vs. replace comparison in detail can help clarify which path fits your specific situation.
Our take: Restoration works, but replacement still has its place
It's easy to look at the cost savings and assume restoration is always the smarter move. We get it. When the alternative is a $20,000 replacement bill, a fraction-of-the-cost rejuvenation sounds like an obvious win. But after working with hundreds of homeowners across Broward and Palm Beach County, we've learned that honest advice matters more than a quick sale.
Lab evidence supports the flexibility improvements. Research confirms that soy-based treatments restore measurable shingle performance. But there's an important distinction between restoring a shingle's flexibility and fixing the structural or moisture-related problems that sometimes exist underneath. No surface application fixes rot in the decking, failed flashing around a chimney, or shingles that have already lost so much granule coverage that UV damage is accelerating by the day. As some roofing professionals point out, proponents cite lab-backed flexibility gains while skeptics warn that coatings don't fix underlying issues, and those skeptics aren't entirely wrong.
What we've seen in practice is this: restoration adds real years affordably when shingles are basically sound and the underlying structure is intact. It's genuinely the right call for a large percentage of homes in this region, where intense sun dries out shingles before the rest of the roof has any real problems. But for roofs with deep damage, past their functional lifespan, or showing structural compromise, replacement is still the only responsible answer.
We encourage you to compare rejuvenation to full replacement carefully before deciding. And if you're genuinely unsure which category your roof falls into, ask a certified professional to assess it. Not every roof can be saved. The ones that can deserve a real shot at it.
Ready to renew your shingle roof? See our certified restoration services
If you're convinced restoration might be the smart move for your home, here's where to get professional help right here in Broward or Palm Beach County.
At Shingle Roof Renewal, we are certified Fresh Roof applicators using GreenSoy Technology, designed specifically for the South Florida climate. We offer free, no-obligation roof inspections so you know exactly where your roof stands before committing to anything. Our restoration service options cover a full range of asphalt shingle conditions, and our team has helped homeowners throughout the region, including those looking for Fort Lauderdale shingle restoration, save thousands while extending their roof's life by a decade or more. If your roof qualifies, you could save up to 80% compared to replacement, all backed by our 6-year transferable warranty. Schedule your free inspection today.
Frequently asked questions
How long does shingle rejuvenation last?
A proper application can extend shingle life by 5 to 10 years if the roof is in good condition prior to treatment, and some certified products like GreenSoy Technology are designed to deliver results lasting up to 15 years with proper maintenance.
Is roof rejuvenation allowed under Florida building code?
Yes, as long as less than 25% of the roof is damaged or missing and there is no excessive structural damage or granule loss. Per the National Roof Repair Authority, roofs exceeding those thresholds require full replacement under Florida code.
Do soy-based rejuvenators actually improve shingle performance?
Lab tests confirm they restore flexibility, tensile strength, and UV resistance to near-new condition in most aged shingles, making them a scientifically supported option for roofs that qualify.
Can I restore a roof with widespread mold or rot?
No. Roofs with rot or major structural issues are not candidates for rejuvenation and should be replaced. Per the National Roof Repair Authority, applying treatment to a roof with structural damage or more than 30% granule loss creates code compliance risks and does not address the root problem.